Tracking app – using bTraced for iPhone with MyWakes

First execution and setup of bTraced tracking app

After having installed bTraced tracking app for iPhone you can begin tracking your trips but no one will be saved yet.
To keep your tracks history you need to make up some setting in you just installed App.

Click “Settings” icon on the bottom right to open settings menu.
Then click “Upload server” link to set up the server.

Click on “Server” button, near default server: btraced.com.

Select “Customized…” from menu
In text field write the following URL: https://www.mywakes.com/api/btraced
Save setting and then return to “Server” menu in order to set up Username and Password.

If you already have your own MyWakes account please fill Username and Password fields with your credentials and let’s start tracking.
If you are a new user please fill Username field with your e-mail address and Password field with any password you want (at least 8 alphanumeric characters).
After creating your account and you start tracking, MyWakes will send you an email to verify your identity.
Immediately open the email and click on the link inside (to verify the authenticity of your email).
Now you can use bTraced tracking app and keep them on MyWakes tracking platform.
Begin tracking…

To start a new track click “Trips” icon on bottom left and then choose “New trip”.
Write a name for your trip (default is starting date and time).

Position fixing and data sending will start by activating the “Tracking” command at the top of the tracking dashboard; this will last until the same command is turned off.
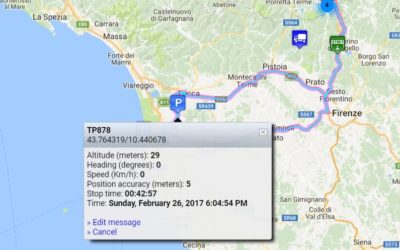
The dashboard also shows the current position (latitude and longitude), speed, altitude, journey time and distance traveled.
Note: the tracking app may require the use of GPS, it is recommended to give consent to improve accuracy.

The “Map” button in dashboard bottom right will show the map with the entire trip (see picture).
The bottom left button shows the number of fixed positions and how many of them have been sent, successfully, to MyWakes.
Messages and off-line tracking

If you see this message this means that your account has been created successfully and you are trying to begin your first trip.
As soon as MyWakes receives the first fix, it will send you an e-mail to the address specified in your Username, to verify your identity.
You must open the email with the subject “Activate your new account | Attivare la tua registrazione | Activer votre inscription” and click on the link in the body of the email to confirm your identity.
After this verification you can start tracking and sending points to MyWakes.

If you are seeing this message it means that you did not clicked the verification link in the body of the mail MyWakes sent to you when you started your first trip.
You need to open this mail and follow the instructions in it in order to track your trips.
When you track your trip without a data connection (or you are in a place without network coverage) you can continue tracking.
You will see that fixtures will increase while, obviously, the number indicating the locations sent to the server will remain still (for example 0/1520 0%).
The App will let you to send data to MyWakes at any time, even by using WiFi, simply clicking on the button that shows the number of fixed points: the positions will be uploaded immediately to the server.
Trips list and advanced settings
By clicking “Trips” icon in the bottom left you will see the full list of trips created with the App.

By selecting a single trip you will see its detail.
In particular, date and time of departure and arrival, traveled distance and number of surveys (each bTraced “trip” can not have more then 1’000 points so, once this limit has been reached, you must start a new “trip”).
Here you can export the track in GPX format, view it on the map or continue the journey (Set trip active).

Scrolling down the page you will be able to share your trip to Facebook or Twitter, you will be also able to display the list of points (View data points).
Furthermore, by clicking “Upload Data Points” the points not yet loaded will be sent to the server.
The “Reset Upload Status” key will reset to 0 the counter of the points sent so, at the next upload, all points from the start will be sent to the server.

From “Settings” icon on the bottom right you can access a series of settings that allow you to optimize your experience of use: the following is an explanation of all the options.
- Run in the background: allows you to trace even if the application is not in the foreground in the phone;
- Add point on turn: when the smartphone’s accelerometer detects a turn, it sends an additional point even if the set time and distance have not passed yet;
- Unit System: unit of measurement (meters, feet, etc.);
- Include points with accuracy: consider only the points that have a better accuracy than indicated;
- Distance update interval: detects a point every x meters (or feet);
- Time update interval: detects a point every x minutes.
Still got more questions about bTraced and MyWakes support?
Pleas take a look at our dedicated FAQs by clicking the following link:
New sensors to detect pauses, stops and new antitheft alarm
From now on the MyWakes portal are provided new features those can be enabled on the Pickway device by putting the "anti-theft function". Among the new features is incluse the function of power on/off to PickWay.This function is used to verify the remote removal of...

Night ride “La Portaccia” starts with MyWakes GPS locators
Tracking runners The 19 July 2014 was held in Castiglione dei Pepoli (BO),a charming town of Tuscan Apennines , the second night race of the Portaccia, a circuit split into three laps for a total length of 11.2 MILES through the streets of the country. The...
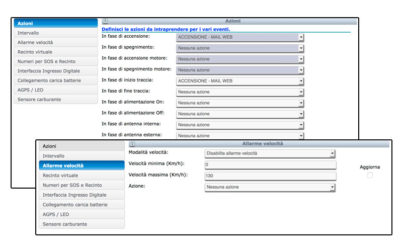
New actions and alerts available on the platform
Improved functionality with the combo "Actions". With the new feature "Actions", the user can decide whether to receive alerts into or out of the virtual fence through SMS or e-mail, may decide the timing of the alarm (how often the alarm is detected), can...
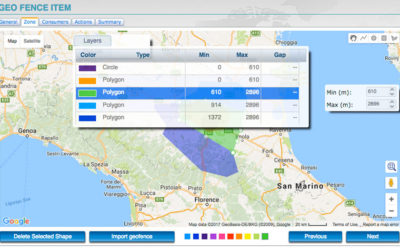
New virtual geo-fences with 3D mode and layers
3D virtual fences and layers are available. In the portal the new 3D virtual fences feature is available. Have been added the 3D virtual fences, complete with dimensions, altitude and height (useful for flight schools), alarms in and out and the new feature...
Download bTraced
![]()
![]()